Node and Express HTTP server
Learn how to use Node and Express to create HTTP servers
- js
- express
- server
Node is often used to create HTTP servers for the web. It’s a bit fiddly to do this with just the built-in modules, so we’re going to use the Express library to help create our server.
HTTP recap
HyperText Transfer Protocol (HTTP) is a way for computers to exchange messages over the internet. The “client” computer will send a “request” (often via a web browser). E.g. if you visit https://google.com your browser sends a request like this:
GET / HTTP/1.1
host: google.com
accept: text/html
A “server” computer receives this request and sends a “response”. E.g. Google’s server would send a response like this:
HTTP/1.1 200 Ok
content-type: text/html

<!doctype html>
<html><body><h1>Welcome to Google</h1>...</body></html>
We’re going to learn how to use Node to create an HTTP server that can respond to requests.
Workshop prep
- Create a new directory
- Move into that directory
- Initialise the project to create a
package.json - Install the Express library
- Open your editor and create a
server.jsfile
mkdir node-server-intro
cd node-server-intro
npm init -y
npm install express
code .
Follow along with each example in your own editor.
Creating a server
We can create a new server object using the express module:
const express = require("express");

const server = express();
Handling requests
Our server currently does nothing. We need to add a “route”. This is a function that will be run whenever the server receives a request to a specific path.
The server object has methods representing all the HTTP verbs (GET, POST etc). These methods take two arguments: the path to match and a handler function.
const express = require("express");

const server = express();

server.get("/", (request, response) => {
  response.send("hello");
});
Here we tell the server to call our function for any HTTP GET requests to our home path.
The handler function will be passed two arguments: an object representing the incoming request, and an object representing the response that will eventually be sent.
We can use the send method of the response object to tell Express to send the response. Whatever argument we pass will be sent as the response body.
Starting the server
Our Node program has a functioning server, but that server isn’t currently listening for requests. Servers need to connect to the internet and listen for incoming HTTP requests on via a “port”.
A “port” is an entry/exit point on a computer to allow network connections (like an airport allows people in/out of a country). HTTP uses port 80 by default (and HTTPS uses 443), so you don’t normally see them in URLs on the web. E.g. when you visit https://google.com you are really going to https://google.com:443.
When you’re running a server locally in development it’s common to use a random number like 3000 or 8080. You can access a port by adding it to a URL like this: http://localhost:3000.
We can tell our server to listen on a port like this:
const express = require("express");

const server = express();

server.get("/", (request, response) => {
  response.send("hello");
});

const PORT = 3000;

server.listen(PORT, () => console.log(`Listening on http://localhost:${PORT}`));
We use the listen method of the server object. This takes the port number to listen on, and an optional callback to run when it starts listening. This callback is a good place to log something so you know the server has started.
Now we can run the program in our terminal:
node server.jsThe server will start and you should see “Server listening on http://localhost:3000” logged.
Important: The Node process will continue running until you tell it to stop by typing control + c in your terminal. Every time you change your code you must stop the old process and start a new one by running node server.js again.
Sending requests
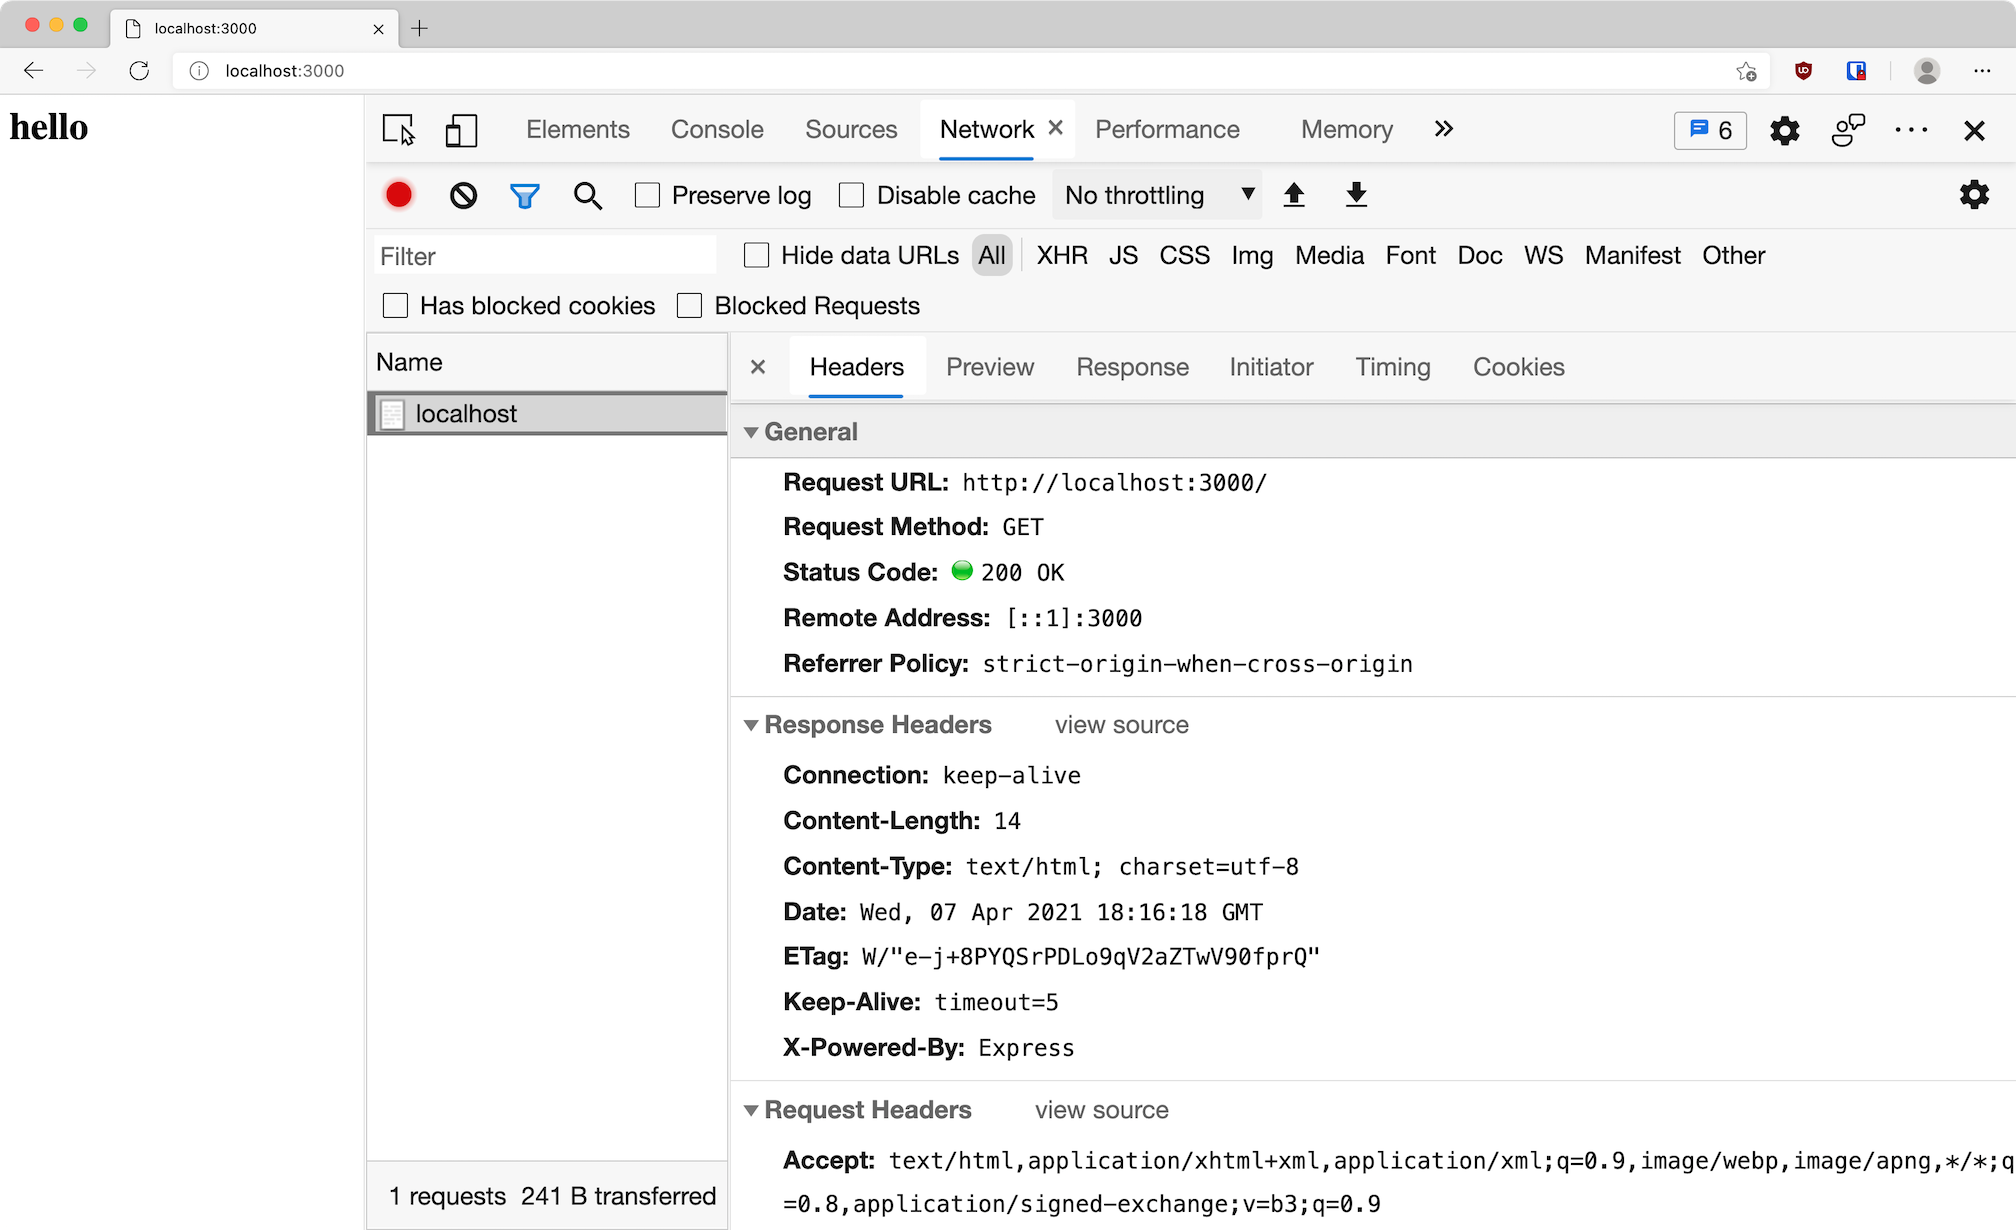
Open http://localhost:3000 in your browser. This will send a GET request to your server. You should see the “hello” response on the page. It’s helpful to open the network tab of the dev tools so you can see all the details of the request and response.
The response
HTTP responses need a few different things:
- A status code (e.g.
200for success or404for not found) - Headers to provide info about the response
- A body (the response data itself)
Status code
We’re currently only providing the body. Express will set the status code to 200 by default. To set a different code use the response.status method:
server.get("/", (request, response) => {
  response.status(404);
  response.send("hello");
});
You can chain this together with send to make it shorter:
response.status(404).send("hello");Headers
Express will automatically set some headers describing the response. For example since we called send with a string it will set the content-type to text/html and the content-length to the size of the string.
You can set your own headers using the response.set method. This can take two strings to set a single header:
response.set("x-fake-header", "my-value");Or it can take an object of string values to set multiple headers:
response.set({
  "x-fake-header": "my value",
  "x-another-header": "another value",
});
HTML body
We aren’t limited to plaintext in our body. The browser will parse any HTML tags and render them on the page. Change your handler to return some HTML instead:
server.get("/", (request, response) => {
  response.send("<h1>Hello</h1>");
});
Visit http://localhost:3000 again and you should see an h1 rendered.
Since we’re rendering HTML using strings we can insert dynamic values using template literals. Let’s add the current time to the response:
server.get("/", (request, response) => {
  const time = new Date().toLocaleTimeString();
  response.send(`<h1>Hello, it's ${time}</h1>`);
});
JSON body
We aren’t limited to a text response. Lets send some JSON as well. Add a new route to your server:
server.get("/json", (request, response) => {
  response.send({ message: "Hello" });
});
HTTP response bodies are always strings, so Express will automatically convert our object to a JSON string for us. It will also set the content-type header to application/json.
Visit http://localhost:3000/json and you should see a JSON object with a message property.
Redirects
Sometimes we want to redirect the request to another URL. You can use the response.redirect method for this. Add a new route:
server.get("/redirects", (request, response) => {
  response.redirect("/");
});
Now if you visit http://localhost:3000/redirects in your browser you should end up back on the home page. If you look at the network tab in the dev tools you’ll see two requests.
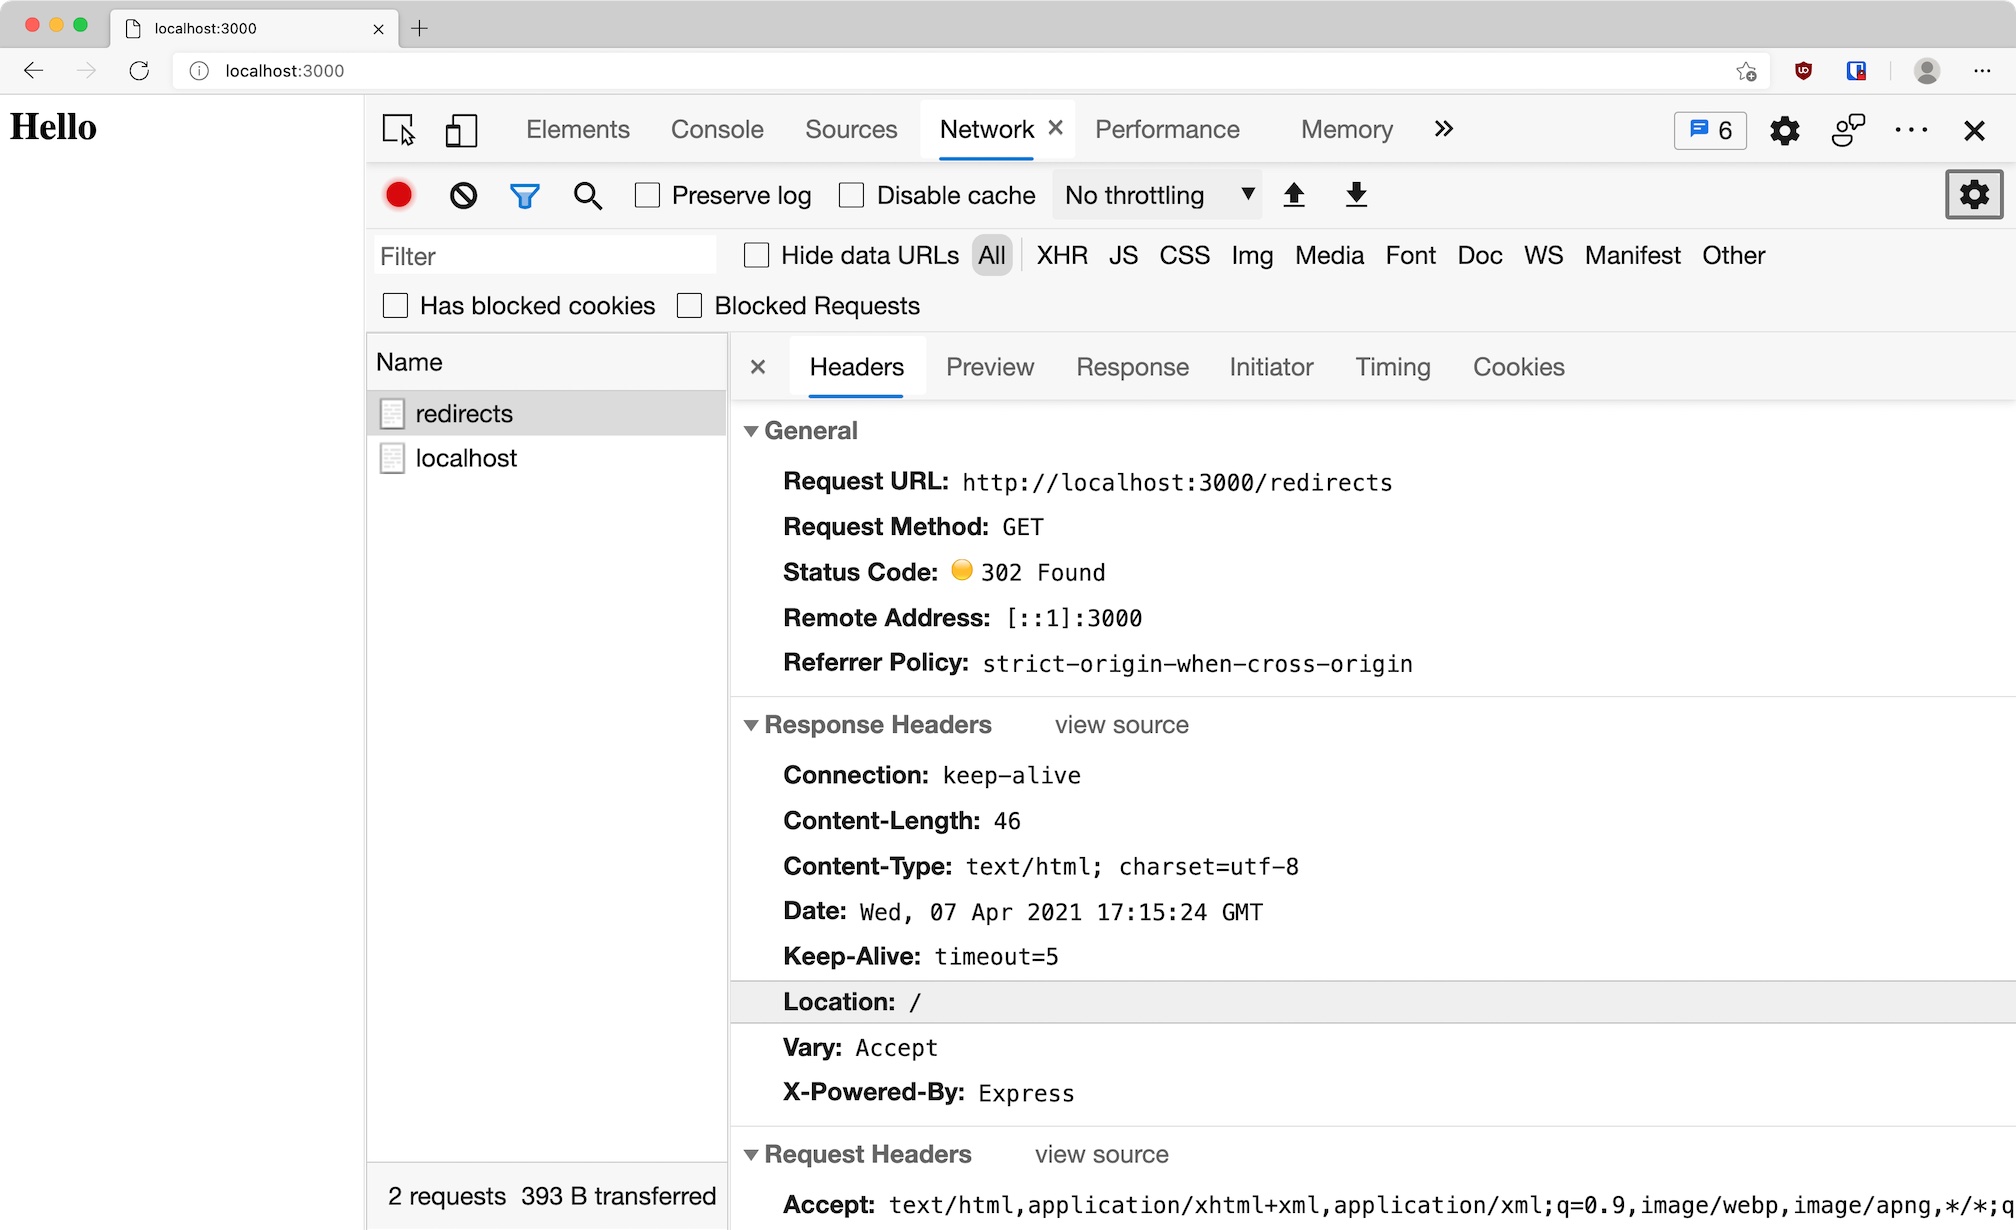
First a request to /redirects. This has a response status code of 302 and a location header pointing to /. This tells the browser to then make a second request to /.
Dynamic route paths
Sometimes you can’t know in advance all the routes you need. For example if you wanted a page for each user profile: /users/oli, /users/dan etc. You can’t statically list every possible route here. Instead you can use a placeholder value in the path to indicate that part of it is variable:
server.get("/users/:name", (request, response) => {
  const name = request.params.name;
  response.send(`<h1>Hello ${name}</h1>`);
});
We use a colon (:) to indicate to Express that any value can match a part of the path. It will put any matched values on the request.params object so you can use them.
If you visit http://localhost:3000/users/oli you should see “Hello oli”. If you visit http://localhost:3000/users/knadkmnaf you should see “Hello knadkmnaf”.
Missing routes
Try visiting http://localhost:3000/not-real in your browser. You should see Cannot GET /not-real. This is Express’ default response for when no handler matches a path.
You can customise this by putting a “catch-all” handler after all your other routes. If no other route matches then this will be used (since Express matches them in the order they are defined).
We can use the server.use method to create a handler that will match any method/route:
server.use((request, response) => {
  response.status(404).send("<h1>Not found</h1>");
});
Reload http://localhost:3000/not-real and you should now see your custom response.
Middleware
Express route handlers don’t have to send a response. They actually receive a third argument: the next function. Calling this function tells Express to move on to the next handler registered for the route.
Let’s add another handler for the home route. It will just log the request, then move on to the next handler:
server.get("/", (request, response, next) => {
  console.log(request.method + " " + request.url);
  next();
});

server.get("/", (request, response) => {
  response.send("<h1>Hello</h1>");
});
If you run this code and refresh the home page you should see GET / logged in your terminal.
The route methods accept multiple handler functions, so you can actually pass them all in one go. This does the same thing:
function logger(request, response, next) {
  console.log(request.method + " " + request.url);
  next();
}

server.get("/", logger, (request, response) => {
  response.send("<h1>Hello</h1>");
});
Express calls handlers that don’t send a response “middleware”. Our example here isn’t that useful, but we could change it to run before all requests. We can do this with server.use:
server.use(logger);Now we’ll get a helpful log like GET / in our terminal when we load any page. Without middleware we would have to copy this into every route we wrote.
Static files
It’s common to have some static files that don’t change for each request. E.g. CSS, images, maybe some basic HTML pages. For convenience Express includes a built-in middleware for serving a directory of files: express.static.
Create a new directory named public. This is where we’ll keep all the files sent to the client. Create a public/style.css file with some example CSS.
Finally configure the middleware to serve this directory:
const staticHandler = express.static("public");

server.use(staticHandler);
The server will now handle requests to http://localhost:3000/style.css and respond with the file contents. Note that there is no public in the final URL: Express serves the files from the root of the site.
Post requests
So far we’ve only created GET handlers. Let’s add a POST handler to see how we’d deal with forms submitting user data to our server:
server.post("/submit", (request, response) => {
  console.log("posted");
  response.send("thanks for submitting");
});
We can’t make a test POST request as easily in our browser, since that would require a form. Instead we can send a request from our terminal using the curl program.
Open a new terminal window/tab and run:
curl -X POST localhost:3000/submitYou should receive a response of “Thanks for submitting”. You can add the --verbose flag to see the entire HTTP request/response. If you check the terminal where your server is running you should see “posted” logged.
Request body
A POST request that doesn’t send any data isn’t very useful. Usually a form would be submitting some user input. We can add data to our curl request with the -d flag:
curl -X POST localhost:3000/submit -d "name=oli"However since bodies can be large they come in lots of small chunks. This means there’s no simple way to just access the body. Instead we must use a “body parser” middleware.
For convenience these are included as part of the Express module. Request bodies can come in different formats (JSON, form etc), so we must use the right middleware. We want express.urlencoded, which is what forms submit by default. This is a function we call to create our middleware:
const bodyParser = express.urlencoded();

server.post("/submit", bodyParser, (request, response) => {
  console.log(request.body);
  response.send("thanks for submitting");
});
This middleware will wait until all the submitted data has been received, then add a body property to the request object. We can then read this property in our handler.
If you use curl to send another POST request you should see something like { name: 'oli' } logged in your server terminal.
That’s it, you’ve learnt the basics of using Node and Express to create an HTTP server.