Git workflow
Practice collaborating on code using Git and GitHub, including branches, pull requests, and resolving merge conflicts.
- git
- fundamentals
An exercise to practice git workflow skills. The workshop should be undertaken by two programmers, working on two computers.
Note: you may see references to a master branch in diagrams or external resources. This used to be the name of the default Git branch, but this was changed to main last year. New repos should all have a main branch, so that’s what you should use.
Part 1: Initial setup
You’re working in a team of two on a project for a new client. Steps 1 to 8 in this section should be completed by one of you, who we’ll refer to as Programmer 1.
Step 1: make a new repo
Programmer 1 creates a new GitHub repo and clones it.
- Create a new GitHub repo on Programmer 1’s profile, making sure to initialise it with a
README.md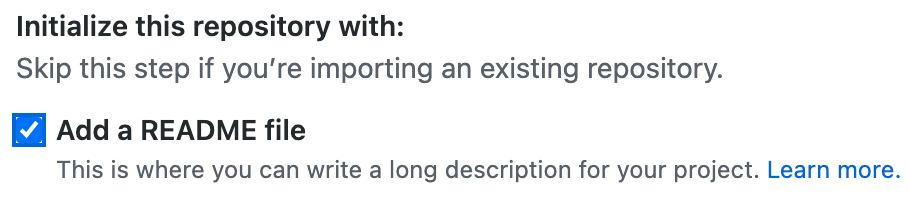
- Go to “Settings > Collaborators” and add Programmer 2 so they can access the repo
- Programmer 2 should check their email and accept the invite to collaborate
- Clone this new repository using your terminal.
git clone 'PASTE THE URL OF YOUR REPOSITORY HERE' - Move into the newly created directory.
This is what your remote and local repositories look like after this. HEAD is a reference to your current location.cd your-repo-name-here

Step 2: raise issues
Normally you would decide on which “features” you were going to build and then break these down into smaller tasks before starting the work. These tasks can be tracked with GitHub issues.
For the sake of this exercise, we’re just going to add one issue at the moment. Your client wants a beautifully styled heading for the homepage. It should be bold black writing with a background shadow that makes it stand out.
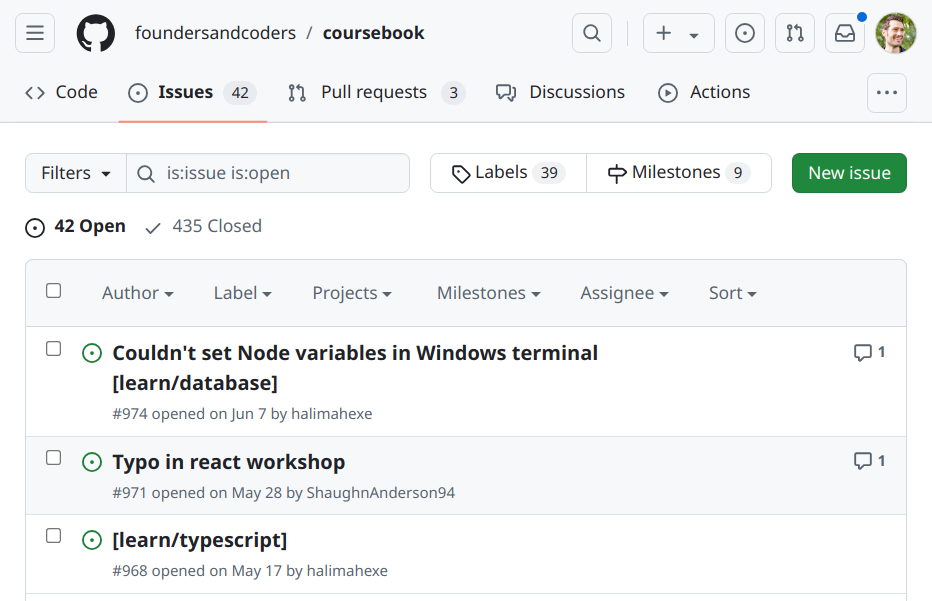
This is how the issues console looks on GitHub.
- Raise a new issue with a descriptive title.
- In the body of the issue, provide more detail about how to complete the work.
- Assign yourselves to this issue.
Step 3: move to a new branch
There are many types of workflow. At FAC we use GitHub flow, where the main branch is always deployable. In this flow, each branch is used for a separate feature.
- Create a branch with a unique and descriptive name. For example,
create-heading-with-shadow.git branch create-heading-with-shadowGitFlow.png)
- Leave the main branch by switching to the new branch you have just created.
git checkout create-heading-with-shadowGitFlow.png)
Alternatively you can do this in a single step by using the -b flag to tell the git checkout command to create the new branch:
git checkout -b create-heading-with-shadowAn easy way to check which branch you are working on is to look at the VS status bar. In the following example, the branch is ‘FAC30_updates.’

By clicking on the branch name, you can view all branches, both local and remote (those that are in the repository but not on your local machine)."
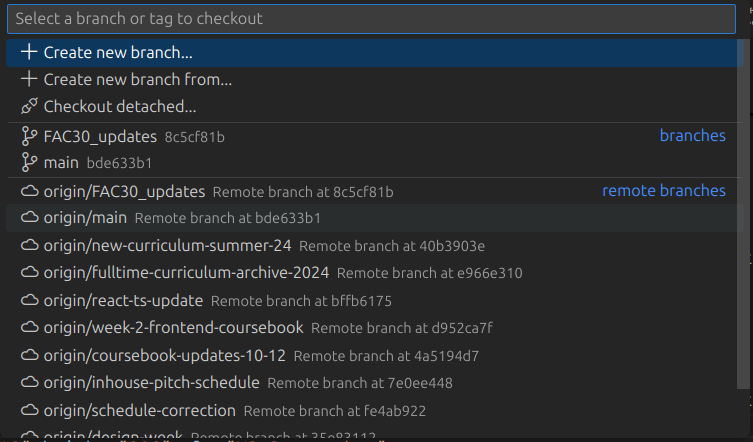
This can be useful to get the big picture, but we highly recommend using the command line instead. The equivalent command to show all the branches is:
git branch -a."Step 4: satisfy the requirements
Now we need to write some code to add the new feature.
-
Add the following code into a new file called
index.html.<!DOCTYPE html>
<html lang="en">
<head>
<meta charset="UTF-8" />
<meta name="viewport" content="width=device-width, initial-scale=1.0" />
<link rel="stylesheet" href="style.css" />
<title>Git Workflow Workshop</title>
</head>
<body>
<h1 class="some-heading">GIT WORKFLOW WORKSHOW</h1>
</body>
</html>Note: you may notice errors in this code. This is deliberate—we’ll be fixing them later on in the workshop.
-
Create a new file called
style.csswhich contains:* {
margin: 0;
padding: 0;
}
.page-heading {
box-sizing: border-box;
font-family: "Avant Garde", Avantgarde, "Century Gothic", CenturyGothic,
"AppleGothic", sans-serif;
font-size: 3.5rem;
padding: 5rem 3rem;
text-align: center;
text-rendering: optimizeLegibility;
color: #131313;
background-color: #e7e5e4;
letter-spacing: 0.15em;
text-shadow: 1px -1px 0 #767676, -1px 2px 1px #737272, -2px 4px 1px #767474,
-3px 6px 1px #787777, -4px 8px 1px #7b7a7a, -5px 10px 1px #7f7d7d,
-6px 12px 1px #828181, -7px 14px 1px #868585, -8px 16px 1px #8b8a89, -9px
18px 1px #8f8e8d, -10px 20px 1px #949392, -11px 22px 1px #999897,
-12px 24px 1px #9e9c9c, -13px 26px 1px #a3a1a1, -14px 28px 1px #a8a6a6, -15px
30px 1px #adabab, -16px 32px 1px #b2b1b0, -17px 34px 1px #b7b6b5,
-18px 36px 1px #bcbbba, -19px 38px 1px #c1bfbf, -20px 40px 1px #c6c4c4, -21px
42px 1px #cbc9c8, -22px 44px 1px #cfcdcd, -23px 46px 1px #d4d2d1,
-24px 48px 1px #d8d6d5, -25px 50px 1px #dbdad9, -26px 52px 1px #dfdddc, -27px
54px 1px #e2e0df, -28px 56px 1px #e4e3e2;
}
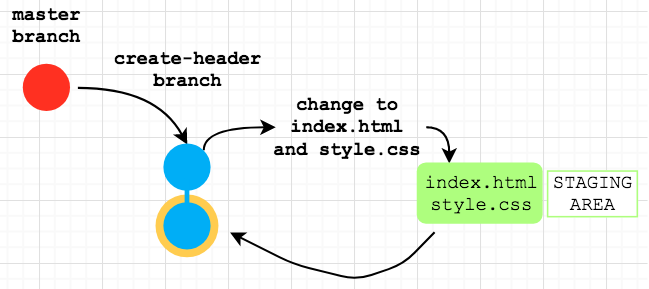
Step 5: stage your changes
Staging changes in Git:
Staging in Git is like a preparation area for your next commit. When you modify files in your project, you can choose which changes to “stage” using the git add command. These staged changes are what will be included in your next commit. This allows you to selectively commit only certain changes, even if you’ve modified multiple files. Think of it as a way to review and organize your changes before making them permanent in your project’s history. For a more detailed explanation, you can refer to staging area.
- Add
index.htmlandstyle.cssto the staging area.
git add index.html style.cssIf you know you definitely want to stage all your current changes you can save some typing and use:
git add .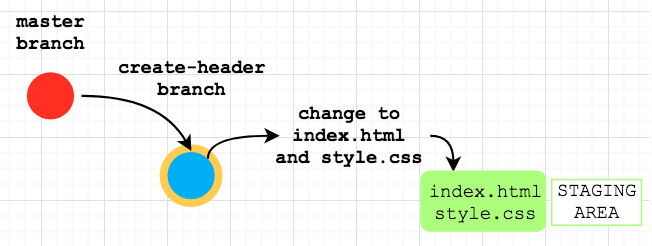
Step 6: commit your changes
The history of a project is made up of “commits”. Each commit is a snapshot of your whole repository at one particular time.
The message you type to describe each commit is important, since it will be preserved in the history of the project for future contributors. It should be descriptive and relatively high-level—someone can always read the code to find out specifically what you changed.
For example this message is not descriptive enough: “update title”. This one is a bit too descriptive: “Use an h1 element with a classname applying nice text shadow CSS”. This one has a good balance: “Add new page heading element with styles”.
Here are some great guidelines on writing better, more useful commit messages.
It’s also important to link your code changes to the issues that track them. GitHub lets you use a hash symbol followed by a number to connect a commit to an issue. For example if the message includes Relates #1 it will show this commit in issue number 1 on the GitHub repo. If a commit totally fixes an issue you can use Closes #1, and GitHub will automatically close the issue when the commit is pushed to GitHub.
-
Commit the files that are in the staging area.
git commit -m 'Add new page heading element with styles' -m 'Relates #1'Here we’re using a second
-mflag to add another line to our commit message with the extra issue info. You could also just rungit commit, which will open your default text editor so you can write longer commit messages in a more comfortable environment.
One final note about committing: Take a moment to review your changes before confirming your commit. While unstaging changes is straightforward, there’s no simple “uncommit” command. Although it’s possible to undo a commit, it can be a complex process, especially if you’ve already pushed the commit to a shared repository. It’s always better to carefully consider your commit before finalizing it.
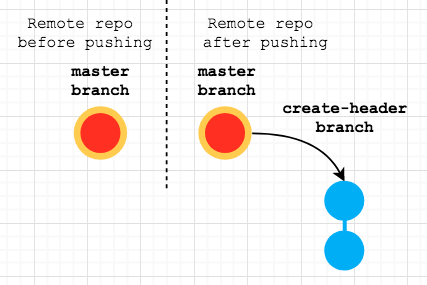
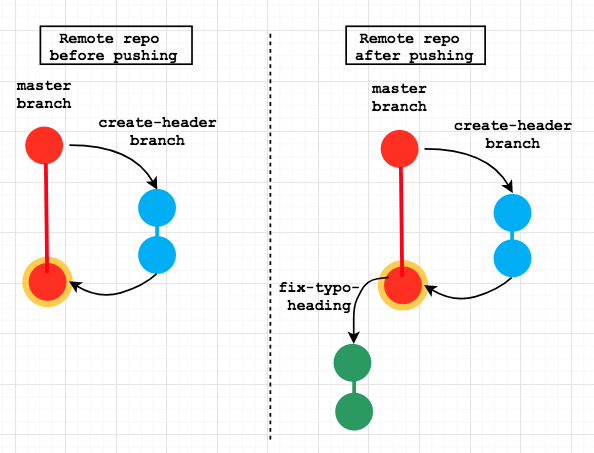
Step 7: push your changes to GitHub
After committing your changes locally, your remote repository on GitHub remains unchanged. To synchronize your local changes with the remote repository, you need to push your changes.
-
Ensure you’re on the correct branch: Before pushing, double-check that you’re on the branch you want to push:
git branchThis should show
create-heading-with-shadowwith an asterisk next to it. -
Push the create-heading-with-shadow branch to the “origin”: The “origin” refers to the GitHub repository that you originally cloned from. Use the following command:
git push origin create-heading-with-shadowThis command tells Git to push your local create-heading-with-shadow branch to the same branch on the remote repository.
-
Check the push result: After pushing, Git will display a message indicating the result. If successful, it will show something like:
To https://github.com/your-username/your-repo.git
* [new branch] create-heading-with-shadow -> create-heading-with-shadow -
Verify on GitHub: After pushing, visit your GitHub repository in a web browser. You should see your new branch listed, and it will contain the changes you just pushed.
Step 8: create a pull request
After pushing your changes to GitHub, the next step is to create a Pull Request (PR). A PR is a way to propose changes from a branch to the main codebase and request review from your teammates.
-
Navigate to the repository on GitHub:
- Open your web browser and go to the GitHub page of your repository.
-
Initiate the Pull Request:
- You should see a prompt suggesting to create a PR for your recently pushed branch. If not, click on the “Pull requests” tab, then click the “New pull request” button.
- Select the branch you want to merge (in this case, create-heading-with-shadow) into the main branch.
-
Set up the Pull Request:
3.1 Add a descriptive title:
- Choose a clear, concise title that summarizes the changes (e.g., “Create page heading with shadow effect”).
- Good titles help reviewers quickly understand the purpose of the PR.
3.2 Write a detailed description in the body:
-
Explain what changes you’ve made and why.
-
Mention any potential impacts or dependencies.
-
If applicable, include steps to test the changes.
-
Link the PR to the relevant issue:
- Use keywords like “Relates #1” to reference the issue without closing it automatically.
- Use “Closes #1” or “Fixes #1” if this PR should close the issue when merged.
3.3 Select reviewers and assignees:
- Assign Programmer 2 as the reviewer. They will be notified to review your changes.
- You can also assign yourself or Programmer 2 to the PR, indicating who’s responsible for moving it forward.
-
Preview and submit:
- Review all the information you’ve added to ensure it’s complete and accurate.
- Click “Create pull request” to submit it.
-
Post-creation actions:
- After creating the PR, you can still edit its description, add comments, or include additional commits to the branch.
- GitHub will automatically run any configured checks or integrations.
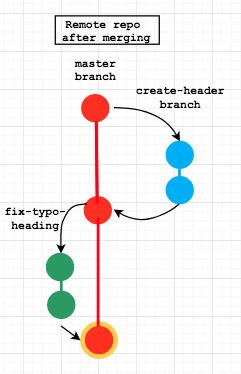
Step 9: merge the pull request
You usually shouldn’t merge your own pull requests. A PR gives the rest of your team the chance to review before your changes are merged into main. In your projects, you will be asking the other pair to do this.
- Programmer 2 reviews the changes. This is where you’d leave any feedback or request changes to be made.
- Programmer 2 merges the pull request
Now your remote repo looks like this:
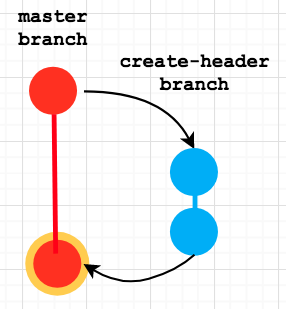
After the pull request is merged, you should address the related issue: If you included “Closes #1” (or similar closing keywords) in your commit message or pull request description, GitHub will have automatically closed the associated issue. If not, you should manually close the issue that tracked this feature, as the work is now complete and merged into the main branch.
—https://github.com/foundersandcoders/coursebook.git
Part 2: splitting the work
Your quality assurance engineer has just noticed some problems with the recent change to the website.
- Spelling mistake in the heading (the word ‘WORKSHOW’ should be replaced with ‘WORKSHOP’)
- The classname applied to the
h1is wrong, so the styles aren’t applying (class="some-heading"should be replaced withclass="page-heading").


Programmer 1 will fix the first problem and Programmer 2 will fix the second. From this point on you both need to work on separate computers.
Note: Only one line in the index.html file needs to be modified.
Step 1: clone the repo (Programmer 2)
- Programmer 2 also needs a copy of the repo, since they haven’t worked on it yet
git clone 'PASTE THE URL OF YOUR REPOSITORY HERE'
Step 2: raise 2 new issues
- Create the following two issues and assign each one to a different person
Fix typo in page heading(Programmer 1)Correct the classname of page heading(Programmer 2)
Remember or take note of the issue numbers when you create them, as you will need these later on.
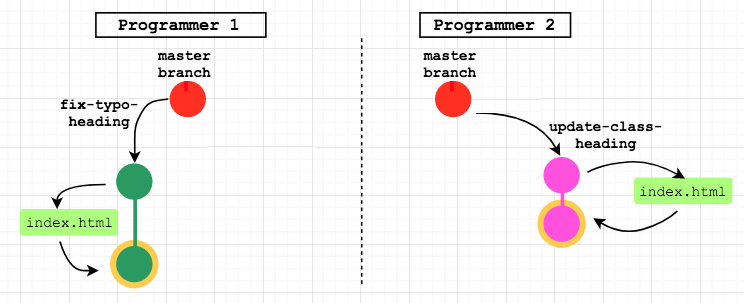
Step 3: create your branches
Git branches are used to make sure each person can work independently without affecting the code others in the team are working on.
- Both programmers create one branch each:
git checkout -b fix-typo-heading(Programmer 1)git checkout -b update-class-heading(Programmer 2).
Step 4: make your changes
It’s important to avoid making unrelated changes as you work. It can be tempting to just quickly fix an error if you spot one while doing some other work. However this makes the Git history of changes really difficult to track. It’s also confusing to review a pull request that has lots of unrelated changes.
- Programmer 1 fixes only the spelling typo in the heading (WORKSHOW -> WORKSHOP).
<h1 class="some-heading">GIT WORKFLOW WORKSHOP</h1> - Programmer 2 updates only the class name of the heading (
class="some-heading"->class="page-heading").<h1 class="page-heading">GIT WORKFLOW WORKSHOW</h1>
Step 5: stage your changes
- Both programmers save their
index.htmlfiles. - Both programmers check the status of their files, to confirm that
index.htmlhas been modified.git status - Both programmers add their modified
index.htmlfile to the staging area.git add index.html
Step 6: commit your changes
- Both programmers should commit their changes. Remember to use a multi-line commit message that references the relevant issue. (Refer back to the issue numbers you noted when you created them.)
Important: don’t work in parallel from here. We want to push, PR and merge Programmer 1’s change first, then move on to Programmer 2’s change.
Step 7: pull any new changes (Programmer 1)
Before pushing your branch, it’s crucial to incorporate the latest changes from the remote main branch. In real-world projects, multiple team members often contribute code simultaneously, which can lead to divergence between your branch and the main codebase. To minimize conflicts and ensure your changes integrate smoothly:
- First, always fetch and merge the latest updates from the remote
mainbranch into your working branch. - Then, resolve any conflicts that may arise from this merge.
- Only after successfully integrating the latest
mainchanges should you push your branch.
Let’s integrate this workflow in our workshop:
- Programmer 1 switches to
mainbranch.git checkout main - Programmer 1 pulls any changes from the
mainbranch of the remote (GitHub repo). There should be no changes since neither of you has pushed any changes yet.
On the default branch you can use a shorthand, since Git knows which remote branch to use:git pull origin maingit pull - Programmer 1 switches back to the
fix-typo-headingbranch.
Since there were no new changes to deal with Programmer 1 can move on to pushing.git checkout fix-typo-heading
Step 8: push changes (Programmer 1)
- Programmer 1 pushes their
fix-typo-headingbranch to remotegit push origin fix-typo-heading
Step 9: create a pull request (Programmer 1)
- Programmer 1 creates a pull request.
- Don’t forget a descriptive title/body (and link the relevant issue in the body)
- Assign Programmer 2 to review
Step 10: review the pull request (Programmer 2)
- Programmer 2 reviews the pull request
- Step through each commit (in this case one)
- Check the “Files changed” tab for a line-by-line breakdown.
- Click “Review changes” and choose from “Comment”, “Approve” or “Request changes”
Step 11: merge the pull request (Programmer 2)
- Programmer 2 merges the pull request
Note: now Programmer 1’s changes are merged we can move on to Programmer 2’s
Step 12: pull any new changes (Programmer 2)
Remember it’s always a good idea to check for any new changes on the remote before pushing your branch. In this case we know that Programmer 1’s branch was just merged, so there will be changes. Once we’ve pulled them to the local main branch we’ll need to merge them into the update-class-heading branch.
-
Programmer 2 switches to
mainbranch.git checkout main -
Programmer 2 pulls the remote
mainbranchgit pullGitFlow.png)
-
Programmer 2 switches back to the
update-class-headingbranch.git checkout update-class-heading -
Programmer 2 tries to merge
mainbranch intoupdate-class-headingbranch.git merge mainAt this point there should be a “merge conflict”. Move on to the next section to find out how to resolve this.
Step 13: resolve merge conflicts (Programmer 2)
This conflict occurred because the line with the <h1> heading was changed by Programmer 1 and Programmer 2. Git doesn’t know how to merge the two different versions of this line together, so it needs you to do it manually. Merge conflicts are highlighted with HEAD and main markers like this:
<body>
  <<<<<<< HEAD
  <h1 class="page-heading">GIT WORKFLOW WORKSHOW</h1>
  =======
  <h1 class="some-heading">GIT WORKFLOW WORKSHOP</h1>
  >>>>>>> main
</body>
The code between <<<<<<< HEAD and ====== is the current change on this branch. The code between the ====== and >>>>>>> main is the change from the main branch that we are merging in.
You can resolve the conflict by manually editing the code to leave only the change you expect. You can also use VS Code’s built-in options to choose either the HEAD or main change (or both). You also need to make sure to remove the conflict marker lines, since those are not valid HTML code. Finally you need to make a new commit for the merge.
- Programmer 2 removes HEAD and main markers
- Programmer 2 manually merges the two different
h1lines to keep both new changes<body>
<h1 class="page-heading">GIT WORKFLOW WORKSHOP</h1>
</body> - Programmer 2 adds the
index.htmlfile to staging area and commits the merge changes.
git add index.html
git commit -m 'Merge main and resolve conflicts'GitFlow.png)
Step 14: push your changes (Programmer 2)
- Programmer 2 pushes the
update-class-headingbranch to remote.
git push origin update-class-heading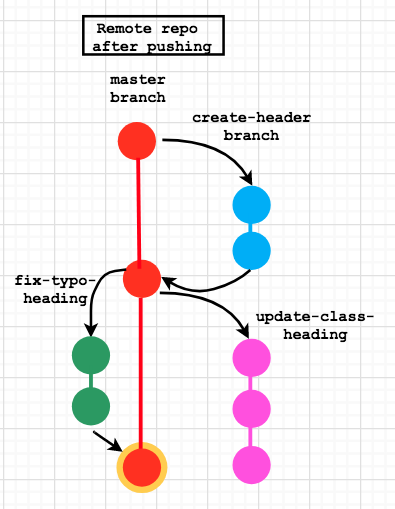
Step 15: create a pull request (Programmer 2)
- Programmer 2 creates a pull request.
- Don’t forget a descriptive title/body (and link the relevant issue in the body)
- Assign Programmer 1 to review
Step 16: review the pull request (Programmer 1)
- Programmer 1 reviews the pull request
- Step through each commit (in this case one)
- Check the “Files changed” tab for a line-by-line breakdown.
- Click “Review changes” and choose from “Comment”, “Approve” or “Request changes”
Step 17: merge the pull request (Programmer 1)
- Programmer 1 merges the pull request
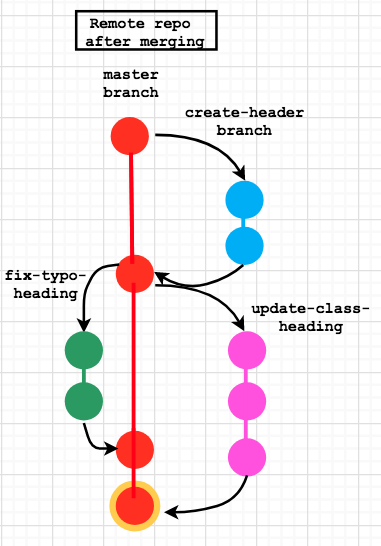
Finishing up
That’s it, you have successfully followed the GitHub flow to add a new feature and fix some bugs.
Both Programmer 1 and Programmer 2 can switch back to the main branch and pull the remote changes. They should also both delete their other local branches since they are now merged. The final step should be to close any open issues (if the PRs didn’t do this automatically).